Heading out the door? Read this article on the new Outside+ app available now on iOS devices for members! Download the app.
It’s no joke that pull-ups are one of the best exercises ever devised. The pull-up is a true test of strength and endurance that just may be the single best move you can do to develop your back and biceps.
Here, we’ve invited two of our favorite experts — Samantha Clayton, Vice President of Worldwide Sports Performance and Fitness for Herbalife Nutrition and a former Olympian who competed for the U.K. in the Sydney 2000 Games, and health coach and virtual fitness studio owner Aimee Nicotera, MS — to help you master the “ups” and “downs” of this all-time classic.
4 Steps to the Perfect Pull-Up
From how to grasp the bar, to proper body positioning, to just how high you should aim to go, here’s what you need to know to fine-tune your pull-up.
1. The Set-Up
The beauty of this exercise is that you only need one piece of equipment — a pull-up bar. Any gym worth its chalk will have one or more available. In addition to a dedicated pull-up bar attached to a wall or ceiling, sometimes you’ll find them in the center of a pulley cable station, too. A number of powerlifting racks also have them built in, and if there’s an assisted pull-up machine where you train, the knee pad can be retracted so that you can do pull ups freely within the apparatus.
Pick whichever you feel most comfortable with, and get ready to monopolize it for 10 minutes or so. You may need to grab a platform as well if you want to use one to get yourself up on the bar.
2. ‘Dead’ Right
If you’re using a traditional pull-up station, you’ll either jump up to grasp the bar with an overhand grip a couple of inches outside shoulder width, or if you’re still learning the ropes, you can use the aforementioned step or platform to get up into position.
Your grip on the bar should be solid and strong, with your thumbs wrapped around (versus a naked grip, where your thumb and fingers are all on the same side). To start, you want to assume a “dead hang” position, elbows fully extended so your body is hanging all the way down. You should bend your knees so they clear the floor, and you can cross them one over the other if you find that to be more comfortable — “some people prefer to cross their legs at the ankles to provide more overall body stability,” Nicotera says.
Pro Tip: While we’re describing the traditional “pronated” grip, with the palms facing forward, some people might find that the exercise is more beneficial with a supinated grip — your palms facing you. “The supinated grip puts the shoulder in a less compromised, externally rotated position versus being internally rotated when you use the pronated grip,” Nicotera explains. “A supinated grip can help improve posture and combat rounded shoulders.”
With that said, Nicotera does advise regularly trying different grips, which can be especially helpful for anyone who competes in obstacle course races where rings, monkey bars, rope climbs and wall traverses are common challenges. (For more on pull-up grip options, see “Get a Grip” later on in this article.)
3. On the Rise
From the dead hang position, you’ll generate power through your lats, back and biceps to begin pulling your body upward. Focus on keeping your elbows pointing out to the sides as they bend — your upper arms will approach your flank as you power your body upward, with the goal of bringing your chin just above the level of the bar at the very top.
Throughout this action, you want to keep your body stable, so you’re moving in a straight line toward the ceiling without swinging or otherwise contorting yourself to generate extra lift. Your muscles should be doing the work, not momentum.
As for breathing, you can approach it one of two ways: You can inhale deeply at the bottom, hold your breath as you rise, and then breathe out fully once your chin crosses the level of the bar. Or you can simply breathe in as you’re lowering yourself and breathe out as you’re pulling yourself upward — which Clayton prefers.
“Breathing in as you go down and exhaling as you pull up helps to engage the core,” she says. “I find that breath holding can sometimes lead to neck strain for some.”
On Cue: “Draw your elbows inward towards the ribs to initiate the movement,” Nicotera suggests. “Throughout, your chest should remain in a ‘lifted’ position. Think about your spine staying long and keeping those legs stationary.”
Error Alert: “As you start to initiate the movement, think about pulling your shoulder blades down and back as you pull yourself up toward the bar, leading with your chest and avoiding excessively arching the back,” Clayton says. “Engage your core muscles to maintain a neutral back position.”
4. Reverse Engineering
At the very top, as your chin crosses over the bar, try to hold yourself in that position momentarily for a one-count before starting your descent. Take it slowly — you don’t want to simply “drop” quickly but instead control yourself the whole way down back to the dead hang.
“If you find that you’re only going partway or halfway down, that indicates you either have a lack of confidence in your ability to do the move, or you don’t quite have the strength yet to get yourself back out of the very bottom,” Nicotera says.
She has a few suggestions for combatting this and building up the power and skill you need:
- Instead of doing pull-ups, you can start by practicing just hanging from the bar, trying to extend the time you can do so. An initial goal can be 15 seconds, and then you add five seconds at a time from there. “Starting out just hanging from the bar can help develop grip strength, which will directly translate to your ability to do the motion later,” Nicotera says.
- You can also do holds at the top of the movement; you jump up or use a step to get into the top position, arms flexed and chin at bar level, holding yourself there for 5-10 seconds and adding time from there for subsequent bouts. Trying, say, 4-6 holds in a workout is a great start.
- You can keep your arms straight and perform mini reps where you only pull the shoulder blades down and releasing them back up. “This can help improve your shoulder girdle stability that’s needed for pull ups,” Nicotera explains.
Error Alert: “The most common error with a pull up is probably using excessive swinging momentum, which is due to a lack of upper body strength,” Clayton says. “People often rely more on their biceps strength than their back — even though the back muscles are stronger and larger than the biceps and should be your primary mover in this exercise.”
Pro Tip: If you can’t manage even one full rep, don’t fret: There are all kinds of options to help you get better at the pull-up in addition to the ones Nicotera outlines above. For instance, if you have a spotter available, he or she can help by cradling your shins underneath their arm or arms, giving you some additional lift on the way up. You can also use a long exercise band that helps propel you up — for this version, you’ll keep your legs straight for the exercise, looping the band around so that it attaches to the bar above and loops underneath both of your feet at the bottom, and thus will assist you as you pull yourself up.
Anatomy of a Pull-Up
What major muscles are involved in the bodyweight pull-up? Here’s the breakdown:
Latissimus Dorsi: The widest muscle of the body, these muscles attach at the spine and fan out toward the outer edge of your back — they engage to help bring your body upward and to the finishing point at the top of a rep.
Teres Major: These are small but important muscles that run laterally next to the scapula, working synergistically with the lats to initiate movement of the shoulder joint.
Biceps Brachii: Your two-headed biceps muscle is made up of a long head and short head, both of which engage strongly during the “up” phase of a pull.
Brachialis: This muscle runs underneath the biceps brachii and flexes the forearm — meaning it’s key for grip strength.
Posterior Deltoid: The rear heads of your three-headed deltoid muscles (i.e., your shoulders) engage as you pull yourself upward.
Erector Spinae: This pair of lower back muscles run up your back on either side of your spine, helping stabilize it by flexing isometrically in concert with your rectus abdominis to keep your trunk aligned as you pull.
Transversus abdominis: This muscle runs from the ribs to the pelvis deep within your abdominal cavity and works as a vital stabilizer of your midsection.
Lumbar Multifidus: This long-thin muscle runs alongside your spinal column and provides vertebral stability.
3 Accessory Exercises for a Better Pull-Up
These three ancillary exercises, suggested by trainer Samantha Clayton, can help improve your strength, stamina and overall form next time you hit the pull-up bar:
1. Seated Cable Row
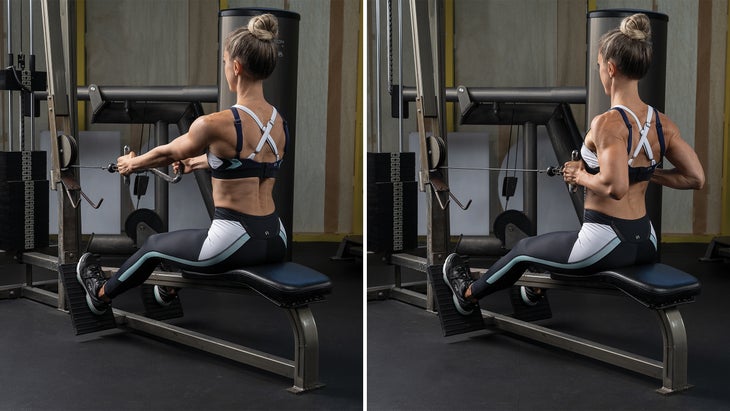
Why: “The seated row, whether you use a machine or even just an anchored band, are fantastic for shoulder retraction.”
How-To: Attach a close-grip handle to the seated row cable machine and sit upright on the bench, facing the weight stack. Place your feet against the foot platform with your legs slightly bent, then reach forward to grasp the handles, leaning back until your torso is erect and your arms are fully extended. Keeping your elbows in close to the sides of your body, pull the handle toward your midsection by bending your arms and shifting your shoulders backward, squeezing your shoulder blades together as the handle reaches your body. Hold for one or two seconds before slowly returning to the start position, not letting the weight stack touch down between reps.
2. Banded Pull Apart
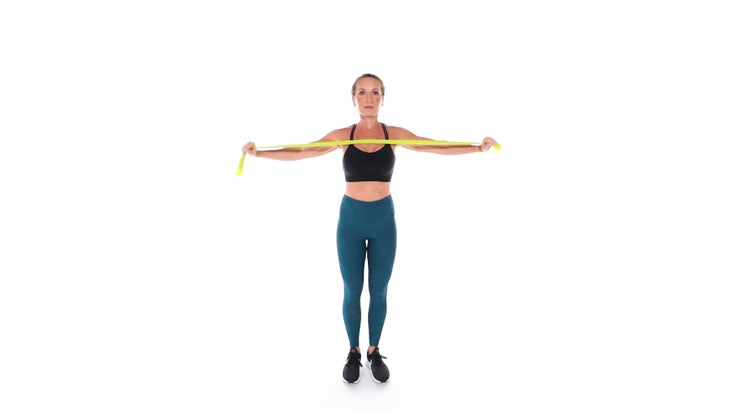
Why: “The pull apart is dynamic and great for improving shoulder strength and stability. This exercise activates the rhomboids, traps and rear delts, which are all needed for pull ups.”
How-To: Assume an athletic “ready” stance, feet set hip-width apart, a slight bend in your knees, and your core tight. Fold the band in half and hold either end with arms extended out in front of you to shoulder height, palms facing down. With your elbows remaining straight but not fully locked out, flex your rear delts to pull each end of the band apart, your arms going out to each side. Pause for a one-count when you pull the band as far apart as you can, then slowly return to the start.
3. Yoga Cat Cow Pose
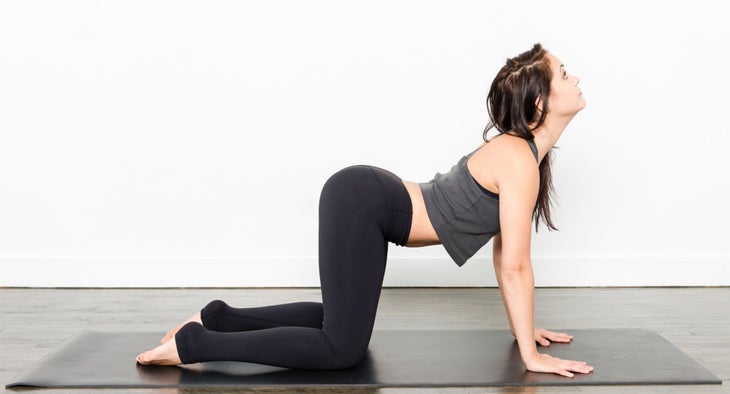
Why: “I have clients do cat cow yoga pose as a cool down after pull-ups, to help them get used to activating and stretching out the upper back.”
How-To: Kneel on all fours so that you are in a tabletop position. Your knees should be positioned straight under your hips and your hands should be on the floor, fingers pointing forward, right underneath your shoulders. Look down at the floor and keep your back flat from your head to your hips. This is your neutral position. Engage your abs and curl your hips under, moving your spine toward the sky until your chin is curled into your chest. This is your cat position. Then, unwind, starting by moving your head so your eyes look toward the sky and your back arches toward the floor and your hips roll up toward the sky. This is your cow position. Roll slowly through the two positions as you inhale and exhale, pausing for a few seconds in each one.
Get A Grip
The traditional pull-up is performed with an overhand grip — but there’s more than one way to perfect your pull. Here, Clayton runs through the three main options.
The Traditionalist: “The pronated grip, with your palms facing forward, is the preferred choice for traditional pull ups. You get more of a focus on the major movers of your back — from your lats inward to the rhomboids and other mid-back muscles — with the wide, pronated grip.”
The Chin: “A supinated grip is when your palms face you and is typically what’s thought of as a ‘chin up’ versus a pull-up. This grip activates less of the lats and rhomboids and involves the biceps more. It’s typically a narrower grip position, which people usually find easier than a grip outside shoulder width. I tend to recommend chins first to get beginners comfortable with the move before progressing to standard pull-ups.”
The Switzerland: “A so-called neutral grip is when your palms face one another with your hands about shoulder-width apart. This grip position wise is great, as the joint angles allow for more fluid movement for many people. It targets the brachialis and brachioradialis muscles in the arms as well as the back, and many people find it is easier to perform more reps.”
The Final Word: “Each grip slightly changes the way the resistance is distributed and how it impacts the various working muscles, so I advise people mix up their grip from time to time and workout to workout. This helps give you the benefit of working the muscles, joints and tendons in a variety of ways from three slightly different angles.”
Quick-Fire Q&A
Trainer Samantha Clayton answers three of your most common questions on the pull-up.
Do you recommend using straps for pull-ups — yes or no, and why?
“It depends on your focus. If you really want to get a strong back but are lacking grip strength to be effective in your repetitions, I support the use of straps. If you want to improve the whole-body movement pattern and master the pull-up in its entirety, ditch the straps, as long term there is more gain from the improved forearm and grip strength.”
Are there any challenges to the pull-up that are more common among women than men?
“Women tend to be more bottom half heavy due to our hips and thighs — our general body weight distribution can make pull ups feel challenging. For women like myself who have had multiple children, it takes time to regain abdominal and pelvic floor strength needed to keep the spine in a neutral position during the pull-up motion. Men, on the other hand, often have superior upper body strength but may lack the flexibility needed to do full, extended-arm reps, leading to cheating and relying more on biceps than back. Flexibility can also be a challenge — some women are too flexible and risk hyperextension of the joints at the bottom of the move, while men with big biceps may struggle with extension.”
Myth or fact: If you’re not strong enough to do a full pull-up, they’re useless and you may as well skip them in your workouts.
“This movement is one that is worth practicing. It effectively works a lot of muscles, and also improves your grip strength and focus. If you’re struggling, keep trying — the effort is doing you good even if you’re not getting many reps to start with.”